Arduino Realtime Audio Processing
This is an experiment to show how some realtime audio processing can be done with the Arduino. The first set of examples alter an incoming audio signal and put it back to an audio output. We achieve effects like Reverb, Phasor, Flanger or Ringmodulator. The second set of examples are outputting computed waveforms like Sinewave, Bell and Xylophone sounds.
Building and testing the Audio Circuit around the Arduino
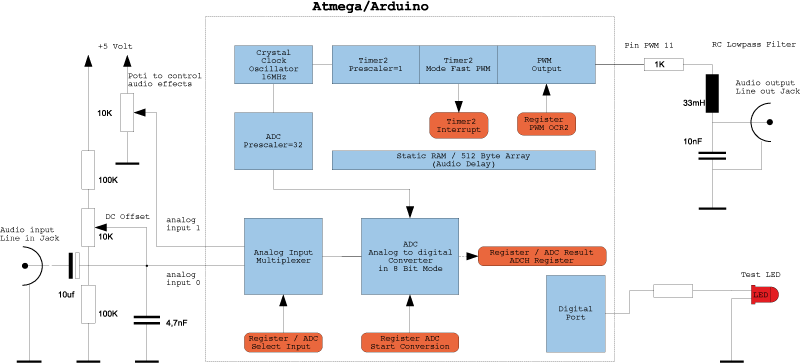
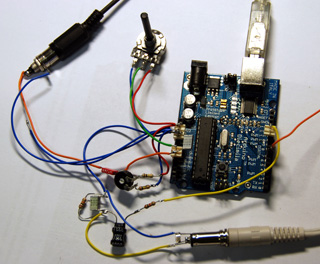
The audio input signal is connected via a 10uF capacitor to the the analog input 1 of the Arduino Board. Two resistors and a trimmpot are adding an DC offset to the audiosignal . A potentiometer connected to analog input 0 will be used to control the audio effects. Pin 11 is used as PWM audio output connected via a RLC Filter to the audio output jack. The output can be connected to a active PC Speakers.
A good way to generate a test Signal is using a PC and a audio software like Audacity. A clip of music or speech is recorded and then filtered with a 3KHz. lowpass function. The Signal has to be filtered to avoid the aliasing effect when the signal gets sampled which would lead to a distorted sound. Now you can connect the PC headphone output to our setup and playback the clip in an endless loop . You might have to use full volume since Arduinos ADC needs a level of 2.5 Volt peak for best quality. When you want to use a microphone or an other input source you have to build an extra preamplifier with an appropriate steep lowpassfilter.
Software Concept
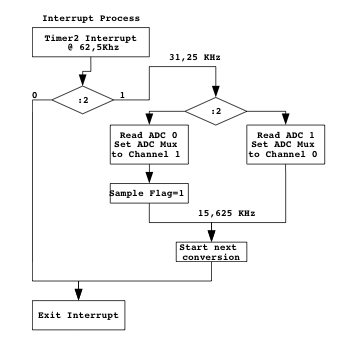
The Software is divided into an interrupt function where the analog sampling an timing takes place and a main loop where the samples are processed an written back to the PWM as audio output. At first the Setup function changes the Timer 2 and ADC parameters. The ADC is set to a fast sampling mode and to 8-Bit precision. Timer2 is used as PWM to convert the digital sample back into an analog value . The prescaler is changed and the interrupt is enabled so that the interrupt service is invoked all 16 uSec or with a rate of 62.5 KHz controlled by the timer hardware. When an interrupt takes place the analog input of channel 0 and 1 is alternately sampled so that the audiosignal is sampled with an effective rate of 15.250 Khz. When a new sample is valid a flag is set which is used in the main loop to synchronize the process. Timer1 is disabled so the Adruino delayfunctions are not available anymore.
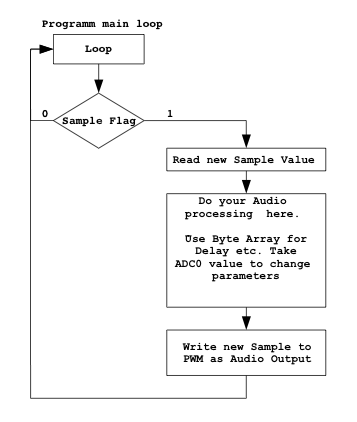
The main loop waits for the sample flag to be set by the interrupt. When the flag is true the new sample value can be taken beeing processed and written back as output to the PWM. In this section you can program all the audio effects . Care must be taken that all calculation must be done in a timeslot of about 65 uSec otherwise you are not synchronous anymore with the sampling process and a distortion in the output signal would appear. If you have a oscilloscope available you can monitor a testsignal on pin 7 which shows a squarewave with a dutycycle corresponding to the remaining processing time.
DC Offset
A natural audiosignal consists of positive and negative waveparts which is leading to an electrical AC audiosignal. Since the Analog to digitalconverter on the Arduino can measure only positive voltages a constant offset has to be added to the signal. This is done with a resistor divider we see in our schematic. With the trimmpot the DC offset has to be adjusted to a value of 127. When doing the audio calculations this offset has to be subtracted first and when the result is calculated to be added again.
Ringbuffer
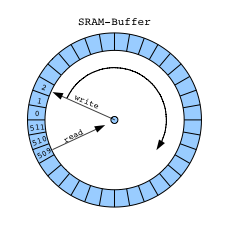
For effects like reverb or phasor you need to delay the audio signal which is done in an memory array of 512 bytes. For longer delays there is not enough memory in the ATMEGA168 available. In a ringbuffer this memoryarray is organized in a loop where write a pointer is used to access a memory location for writing data and a second pointer to address a read location. After a one step is done both pointers are directed to the next location. If a pointer reaches the end of the array (511) the pointer is set to 0 again and old data will be overwritten. The distance between read and write pointers determine the length of the time delay.
Wave Table
Sounds like a sinewave, a bell or xylophone are generated by filling the ringbuffer once with one wavecycle of the desired sound and playback the buffer contens repeatedly in an endless loop.
void fill_sinewave(){
  dx=2 * pi / 512;                    // fill the 512 byte bufferarry
  for (iw = 0; iw <= 511; iw++){      // with  1 period sinewawe
    fd= 127*sin(fcnt);                // fundamental tone
    fcnt=fcnt+dx;                     // in the range of 0 to 2xpi  and 1/512 increments
    bb=127+fd;                        // add dc offset to sinewawe
    dd[iw]=bb;                        // write value into array

  }
}
The sound of a percussive instrument is done by adding a decayfunction in the main loop and adding some overtones to the fundametal sinewave in the waveform function.
void load_waveform(){
  float pi = 3.141592;
  float dx ;
  float fd ;
  float fcnt=0;
  dx=2 * pi / 512;                    // fill the 512 byte bufferarry
  for (iw = 0; iw <= 511; iw++){      // with  50 periods sinewawe

    fd= 100*sin(fcnt);                // fundamental tone

    fd = fd + ( 10*sin(4*fcnt+fcnt));  // plus some overtone

    fcnt=fcnt+dx;                     // in the range of 0 to 2xpi  and 1/512 increments
    bb=127+fd;                        // add dc offset to sinewawe
    dd[iw]=bb;                        // write value into array
  }
}
Source Codes
› arduino_audio_loopback.zip (64 KB)
› arduino_audio_loopback_t1.zip (64 KB)
› arduino_audio_phasor.zip (76 KB)
› arduino_audio_reverb.zip (76 KB)
› arduino_audio_ringmodulator.zip (76 KB)
› arduino_audio_sine_1.zip (76 KB)
› arduino_audio_sine_variable.zip (76 KB)
› arduino_audio_xylo_ping_1.zip (76 KB)
› arduino_audio_xylo_ping_var.zip (76 KB)
Documents
› arduino_realtime_audio_eng.pdf (1,8 MB)
Forum
further questions to this topic can be discussed here:
http://arduino.cc/forum/index.php/topic,64471.0.html
http://www.arduino.cc/cgi-bin/yabb2/YaBB.pl?board=dev
Contact
Martin Nawrath, nawrath@khm.de


